Product Photos Without Professional Equipment | 2026 Guide
Great product photos don't require expensive equipment. Find out what really matters and how to get professional-looking images with what you already have.
Why product photo quality matters
The first thing a shopper does when they land on a product page is look at the images. They don't read the description, check the specifications, or look for reviews. They look at the images. If what they see doesn't convince them within the first three seconds, they close the page and look somewhere else.
You already know this. The real challenge is different: how do you take photos that look professional when you don't have a photo studio, you don't have a photographer, and you don't want to spend hundreds of euros on a photo shoot every time you add new products?
The answer is not as complicated as it seems. Good product photos don't necessarily come from expensive equipment. They come from understanding a few simple principles that most online store owners completely overlook.
A good product photographed poorly sells worse than a mediocre product photographed well. The image doesn't represent the product. In the mind of an online shopper, the image is the product.
On marketplace platforms, the problem becomes even more acute. When your product appears in the same grid as ten competitors, the photo is the only element that differentiates you before anyone clicks. Not the price, not the title, not the reviews. The photo.
What you actually need to take a good photo
A decent smartphone is enough to get started
Any phone released in the last three years has a camera good enough for product photography. The difference between a 300-euro phone and a 1,200-euro phone in the context of product photography is much smaller than you think. What truly makes the difference is not the hardware, it's how you use it.
Turn off digital zoom. Instead of zooming in using the phone's zoom function, physically move closer to the product. Digital zoom visibly reduces image quality, especially when displayed on large screens. If the product is small and you can't get enough detail by moving closer, an inexpensive flexible tripod helps you stabilize the camera at the optimal distance.
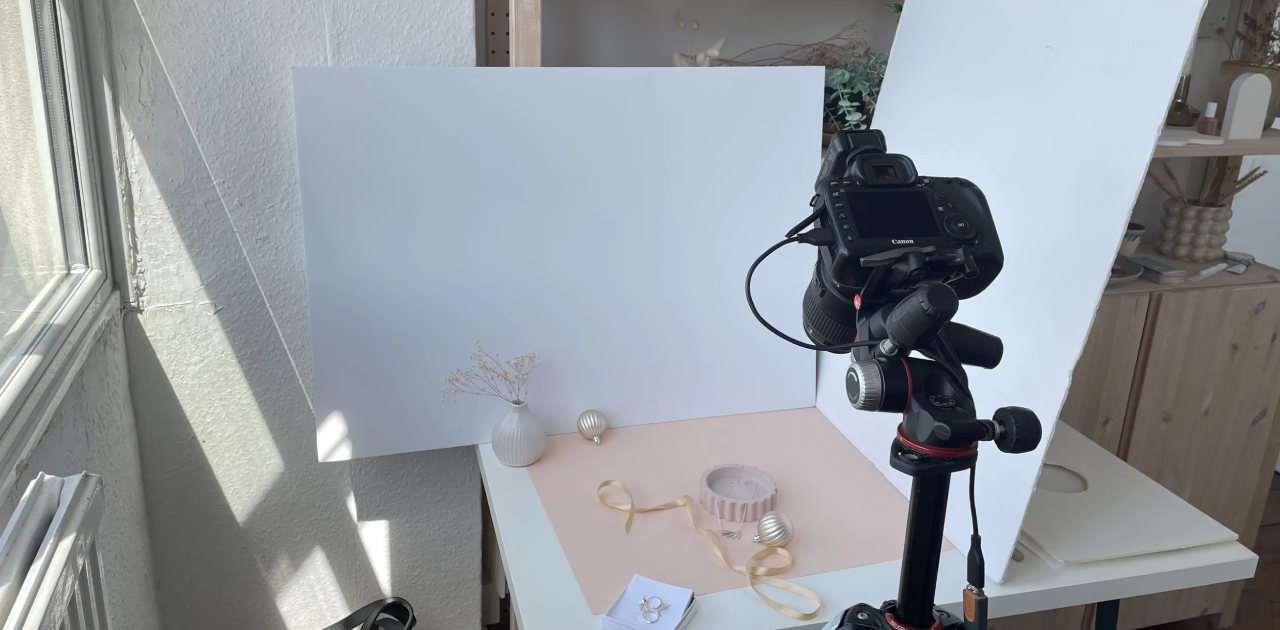
The minimal equipment you need
- Smartphone with at least a 12MP camera Any phone released after 2021 is sufficient. Clean the lens before use and turn off digital zoom.
- Tripod or stable support Eliminates unintended camera movement. An inexpensive tripod from any online store is enough to get started.
- Two large sheets of white cardboard One for the background, one to reflect light from the opposite side of the window. Total cost: under 5 euros.
- A large north or east-facing window Your primary light source. Free, consistent, and on slightly overcast days, perfect for product photography.
Lighting: the factor that makes the difference
If you could only focus on one thing, choose lighting. Light makes or breaks a product photo more than any other factor. And the good news is that the best light source is completely free.
Natural light and how to use it correctly
Position the product near a large window during the day. Natural diffused light, preferably on a slightly overcast day, produces even illumination without harsh shadows. Direct sunlight should be avoided because it creates strong reflections and high-contrast shadows that make the product look flat or distorted.
Window orientation matters more than you might think. A north or northeast-facing window provides consistent light throughout the day, without sudden changes in intensity. South or west-facing windows bring direct sunlight at certain times of day, which can be a serious problem if you don't have diffusing curtains.
The two-light setup for evening shoots
If you're shooting in the evening or in a space without large windows, two artificial light sources positioned symmetrically at 45 degrees to the product will eliminate shadows and create balanced illumination. You don't need professional lighting equipment.
Two desk lamps with neutral white LED bulbs at a color temperature between 5000 and 6500 Kelvin cost very little and produce excellent results. Place one lamp at 45 degrees front-left and one at 45 degrees front-right, at the same height as the product or slightly above. Adjust the distance until the shadows disappear completely.
The right background for any product
A cluttered or inadequate background can ruin an otherwise good photo. The simplest and most effective background you can use at home is a large sheet of white cardboard or a piece of evenly stretched white fabric.
White background: the marketplace standard
White A1 or A0 cardboard, available at any stationery store for a few euros, works excellently for small and medium products. Place it on a flat surface, bend it gently at the back to create a continuous curve that eliminates the horizon line, and shoot from above or straight on. The result is a clean, even background that lets the product stand out.
Lifestyle backgrounds for social media and ads
If you want a colored or contextual background for lifestyle photos intended for Instagram or Facebook Ads, make sure the background color complements the product without overwhelming it visually. A practical rule: choose a background with a lighter and less saturated color than the dominant color of the product.
Natural textured surfaces such as wood, stone, or unbleached cotton work well as backgrounds for home goods, cosmetics, or handmade products. Avoid backgrounds with strong patterns or saturated colors for your main product photos.
Composition and angles
The rule of thirds
Mentally divide the image into nine equal rectangles, like a three-by-three grid. The points where the lines intersect are natural visual interest points. Positioning the product at one of these points, rather than perfectly in the center of the image, creates a more dynamic and visually appealing composition.
Most smartphones have the option to display the composition grid directly on the camera screen. Enable it in your camera settings and use it as a reference until the rule becomes intuitive.
The angles that work best
From above (flat lay)
Ideal for flat products: clothing, accessories, cosmetics, food. Creates a clean, modern editorial look.
At product level (eye level)
The standard for most products and the most used in marketplace listings. Simple and consistently effective.
Slightly front-above (3/4 angle)
Works well for products with surface details: footwear, bags, ceramics. Shows volume and texture simultaneously.
Macro detail
Used for textures, materials, and mechanisms. Communicates quality and attention to detail better than any written description.
The most common mistakes and how to avoid them
- Product too small in the frame. The product should occupy between 70 and 85 percent of the image for main product photos. Excessive empty space makes the product appear insignificant.
- Blurry image from camera movement. Enable the camera timer or use a remote shutter to avoid movement at the moment of capture. Even slight hand movement is enough to lose sharpness.
- Colors that don't match the actual product. Set the white balance manually to daylight or indoor mode depending on your light source. Incorrect white balance makes products appear with yellow or blue tints that mislead shoppers.
- Only one photo per product. A minimum of three photos per product: front, back, and a relevant detail. Stores with five or more photos per product have significantly higher conversion rates.
- Inconsistent dimensions across the catalog. Establish a standard format for all your photos and stick to it consistently. Visual inconsistency undermines trust in your brand before a shopper reads a single word.
Quick post-shoot editing
A good photo taken in good conditions requires minimal editing. The purpose of editing is not to salvage a bad photo, it's to refine a good one.
The basic adjustments you should make to every product photo:
- Brightness and contrast: slightly increase brightness if the image looks dark, and adjust contrast to give the product depth without making shadows look artificial.
- White balance: make sure the white in the background is pure white, not yellow or blue, especially if you used artificial lighting.
- Crop and alignment: crop the image to the desired format and make sure the product is perfectly centered or positioned according to the rule of thirds.
- Saturation: a slight increase in saturation makes the product colors look more vibrant and closer to reality. Avoid exaggerating to the point where the product looks different from what the buyer actually receives.
When smartphone photography is no longer enough
The techniques above will take you very far and are sufficient to start looking professional. But as your catalog grows, manually photographing every product becomes an activity that consumes hours each week.
At tens or hundreds of products, the problem is no longer how to take a good photo. The problem becomes how to generate professional images for the entire catalog without allocating disproportionately large resources to a single operational task.
This doesn't mean manual photography becomes irrelevant. It means you have the option to scale quickly without compromising the visual quality of your catalog, regardless of how many new products you add each week.
Hontrio automatically generates studio-quality images from your existing product photos. Six styles including white background, lifestyle, and premium dark, with automatic quality verification included.
Discover AI Image Generation